Environment & Deployment Guide
Set up local development, configure environment variables, and deploy to Vercel. Production data uses Neon serverless PostgreSQL — the Neon project for Evensiva is provisioned; wire DATABASE_URL from the Neon dashboard into each environment.
Next Steps to Go Live
The codebase is build-ready and compiles successfully with the full App Router tree (public pages, admin, API routes, sitemap.xml, robots.txt). Follow these steps in order to get a running instance:
DATABASE_URL locally and in Vercel. The Neon PostgreSQL section below is a reference for how the project was set up and for onboarding new environments.- Static assets under
public/
Images and PDFs live underpublic/Images/(capitalI) andpublic/PDFs/. On Linux hosts, URLs are case-sensitive — use the same casing in code and seed data (e.g./Images/slider/…). Typical layout:
Legacy assets were moved out ofpublic/ ├── Logo.png ├── Images/ │ ├── slider/ # Homepage carousel │ ├── services/ # Service cards │ ├── courses/ # Course cards │ └── docs/ # Optional screenshots for HTML guides └── PDFs/ # Course PDFssrc/assets/intopublic/; do not commit large binaries you do not need. - Use the Neon PostgreSQL database
Evensiva’s database runs on Neon (already provisioned). Add the Neon connection string toDATABASE_URL— see Environment Variables. To spin up a separate database (e.g. a personal sandbox), follow Neon PostgreSQL; for purely local dev without Neon, see Database Setup (Docker). - Configure environment variables
Create.env.localin the project root with:
See Environment Variables for details on each.DATABASE_URL="postgresql://user:password@host:5432/evensiva?sslmode=require" NEXTAUTH_SECRET="your-random-secret-at-least-32-chars" NEXTAUTH_URL="http://localhost:3000" GOOGLE_CLIENT_ID="" GOOGLE_CLIENT_SECRET="" GITHUB_ID="" GITHUB_SECRET="" NEXT_PUBLIC_GOOGLE_OAUTH_ENABLED="false" NEXT_PUBLIC_GITHUB_OAUTH_ENABLED="false" ADMIN_EMAIL="admin@evensiva.com" ADMIN_PASSWORD="your-secure-admin-password" - Install dependencies
This also runsnpm installprisma generateautomatically. - Initialize the database
Push the schema and seed initial data (admin user, blog posts, courses):npx prisma db push && npm run db:seed - Start the development server
Open http://localhost:3000 and verify all pages load. Confirm auth screens load atnpm run dev/admin/loginand/admin/signup, then sign in with credentials from your.env.local. - Deploy to Vercel
Push to GitHub → import in Vercel → add environment variables (DATABASE_URL,NEXTAUTH_SECRET, optional OAuth vars,ADMIN_EMAIL,ADMIN_PASSWORD) in the Vercel dashboard → deploy. See Vercel Deployment. Optionally add a custom domain under Settings → Domains and setNEXTAUTH_URLto your canonical HTTPS URL if you use one. - Verify production
After deployment, check:- Homepage loads with slider images and service cards
- Blog posts render at
/postsand individual/posts/[slug]pages - Courses page shows data from the database
- Contact form submits to
/api/contact - Admin panel is accessible at
/admin; auth pages work at/admin/loginand/admin/signup /sitemap.xmland/robots.txtare generated
Prerequisites
- Node.js 18+ (LTS recommended)
- npm 9+ (comes with Node.js)
- PostgreSQL — production uses Neon (connection string in
DATABASE_URL); optional local Postgres via Docker for offline work - Git for version control
Environment Variables
Create a .env.local file in the project root (Next.js loads it automatically in development). This file is gitignored and must never be committed. Use the same variable names in Vercel (Settings → Environment Variables) for production, with values appropriate to each environment.
Minimal layout:
# Database (Neon — see Neon PostgreSQL section)
DATABASE_URL="postgresql://…@….neon.tech/neondb?sslmode=require"
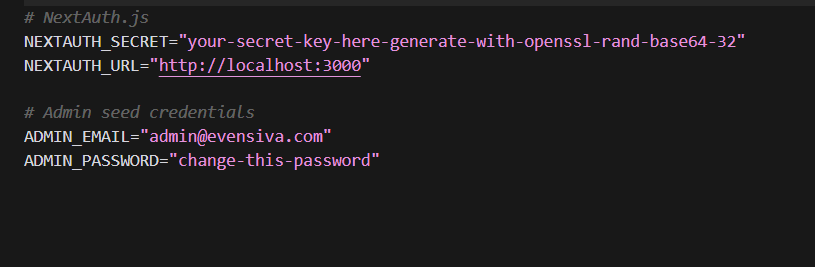
# NextAuth.js
NEXTAUTH_SECRET="your-secret-key-here-generate-with-openssl-rand-base64-32"
NEXTAUTH_URL="http://localhost:3000"
# OAuth providers (optional; required for social auth)
GOOGLE_CLIENT_ID=""
GOOGLE_CLIENT_SECRET=""
GITHUB_ID=""
GITHUB_SECRET=""
# Public feature flags for auth UI social buttons
NEXT_PUBLIC_GOOGLE_OAUTH_ENABLED="false"
NEXT_PUBLIC_GITHUB_OAUTH_ENABLED="false"
# Admin seed credentials
ADMIN_EMAIL="admin@evensiva.com"
ADMIN_PASSWORD="change-this-password"DATABASE_URL
Copy the full URI from the Neon dashboard (Connection string tab). It must include ?sslmode=require. Use one Neon branch/database per environment if you separate staging and production.
NextAuth.js
NextAuth.js v5 uses these values for session signing and callback URLs.
NEXTAUTH_SECRET— Secret key used to sign JWTs and encrypt cookies. It must be long and unpredictable. Generate a fresh value (do not reuse from tutorials or other projects):
Paste the output as the value (keep the quotes inopenssl rand -base64 32.env.local). Use a different secret for production than for local dev if you want sessions to stay isolated. If you ever rotate the secret, all existing sessions invalidate and users sign in again.NEXTAUTH_URL— Public base URL of the app for this environment.- Local dev:
http://localhost:3000(or the port you use, e.g.http://localhost:3001). - Production on Vercel: Usually omit
NEXTAUTH_URL— NextAuth infers the URL from the deployment. If you use a custom domain, set it explicitly, e.g.https://evensiva.com, so redirects and emails match your site. - Preview deployments: If auth redirects misbehave on preview URLs, set
NEXTAUTH_URLto that preview’s canonical URL for testing.
- Local dev:
OAuth providers (optional)
Enable these only if you want Google/GitHub login/signup buttons in admin auth screens.
GOOGLE_CLIENT_IDandGOOGLE_CLIENT_SECRET— credentials from your Google OAuth app.GITHUB_IDandGITHUB_SECRET— credentials from your GitHub OAuth app.NEXT_PUBLIC_GOOGLE_OAUTH_ENABLED— set totrueonly when Google credentials are configured.NEXT_PUBLIC_GITHUB_OAUTH_ENABLED— set totrueonly when GitHub credentials are configured.
OAuth callback URLs:
- Local:
http://localhost:3000/api/auth/callback/googleandhttp://localhost:3000/api/auth/callback/github. - Production:
https://YOUR_DOMAIN/api/auth/callback/googleandhttps://YOUR_DOMAIN/api/auth/callback/github.
NEXT_PUBLIC_* feature flags are intended for browser exposure.Admin seed credentials
These are read by prisma/seed.ts when you run npm run db:seed. They define the initial admin account (upserted by email).
ADMIN_EMAIL— Email address for the admin user (e.g.admin@evensiva.com). Use a real inbox you control if you rely on password recovery later.ADMIN_PASSWORD— Plain-text password only at seed time; Prisma stores a bcrypt hash in the database. Choose a strong, unique password — not the placeholderchange-this-passwordin production. Change it after first login if your process requires it.- After seeding, sign in at
/admin/loginwith this email and password. Re-run the seed after changing these env vars if you need to reset the upserted admin (same email updates the row).
# NextAuth.js block with NEXTAUTH_SECRET and NEXTAUTH_URL, then # Admin seed credentials with ADMIN_EMAIL and ADMIN_PASSWORD.Quick reference
| Variable | Required | Description |
|---|---|---|
DATABASE_URL | Yes | Neon connection string from the dashboard. Same in Vercel for production (or branch-specific URI for staging). |
NEXTAUTH_SECRET | Yes | Random secret for JWT/cookies — generate with openssl rand -base64 32. Unique per environment recommended. |
NEXTAUTH_URL | Local / some hosts | http://localhost:3000 for local dev. Production: often omitted on Vercel; set to your canonical HTTPS URL if needed (custom domain). |
GOOGLE_CLIENT_ID, GOOGLE_CLIENT_SECRET | Optional | Google OAuth provider credentials used by NextAuth. |
GITHUB_ID, GITHUB_SECRET | Optional | GitHub OAuth provider credentials used by NextAuth. |
NEXT_PUBLIC_GOOGLE_OAUTH_ENABLED, NEXT_PUBLIC_GITHUB_OAUTH_ENABLED | Optional | UI feature flags for showing social buttons on /admin/login and /admin/signup. |
ADMIN_EMAIL | When seeding | Admin login email created/updated by npm run db:seed. |
ADMIN_PASSWORD | When seeding | Admin password (hashed in DB). Use a strong value; not committed to Git. |
.env.local to version control. It contains secrets.Local Development
- Clone the repository:
git clone https://github.com/evensiva/evensiva_frontend_app.git cd evensiva_frontend_app - Install dependencies:
npm installThis also runs
prisma generatevia thepostinstallscript. - Create
.env.localwith the variables above. - Push the schema to the database:
npx prisma db push - Seed initial data:
npm run db:seed - Start the dev server:
npm run devOpen http://localhost:3000.
Database Setup
Production and shared dev: use the Neon project described in Neon PostgreSQL — set DATABASE_URL to the Neon URI.
Neon (default)
Evensiva’s primary database is on Neon. Manage branches, connection strings, and pooling in the Neon console. Prisma connects with ?sslmode=require as included in the dashboard URI.
Local PostgreSQL (optional)
For fully offline development without Neon, install PostgreSQL via your OS or Docker:
docker run -d --name evensiva-pg \
  -e POSTGRES_USER=evensiva \
  -e POSTGRES_PASSWORD=secret \
  -e POSTGRES_DB=evensiva \
  -p 5432:5432 \
  postgres:16-alpine
Connection string: postgresql://evensiva:secret@localhost:5432/evensiva
Prisma Commands
| Command | Description |
|---|---|
npx prisma db push | Push schema to DB without migrations (dev) |
npm run db:migrate | Create and apply a migration (prisma migrate dev) |
npm run db:seed | Run the seed script (tsx prisma/seed.ts) |
npm run db:studio | Open Prisma Studio GUI to browse data |
npx prisma generate | Regenerate Prisma Client (runs on npm install) |
Seeding Data
The seed script (prisma/seed.ts) populates the database with:
- Admin user: Created from
ADMIN_EMAILandADMIN_PASSWORDenv vars (bcrypt hashed). - Blog posts: 6 sample posts with categories (JavaScript, HTML, CSS) and slugs.
- Courses: 5 training courses with pricing, schedules, and descriptions.
All records use upsert so the script is idempotent — safe to run multiple times.
Vercel Deployment
- Push your repository to GitHub.
- Import the repository in Vercel. On the New Project screen, Vercel shows the Git provider, repository, branch, team, and framework detection. Before clicking Deploy, confirm:
- Import source — The correct GitHub repo and branch (for example
main) appear at the top. - Vercel Team — Select the team or personal account where the project should live (Hobby tier is fine for development).
- Project Name — This becomes part of the default production URL (
*.vercel.app); Vercel suggests a URL-safe name from the repo (for exampleevensiva-fullstack-app) and you may edit it. - Application Preset — Should be Next.js for this codebase.
- Root Directory — Use
./when the Next.js app is at the repository root. Use Edit if the app lives in a monorepo subfolder. - Advanced — Expand Environment Variables to add secrets before the first deploy (recommended), or add them afterward under Project → Settings → Environment Variables. Build and Output Settings rarely need changes for a standard Next.js build.
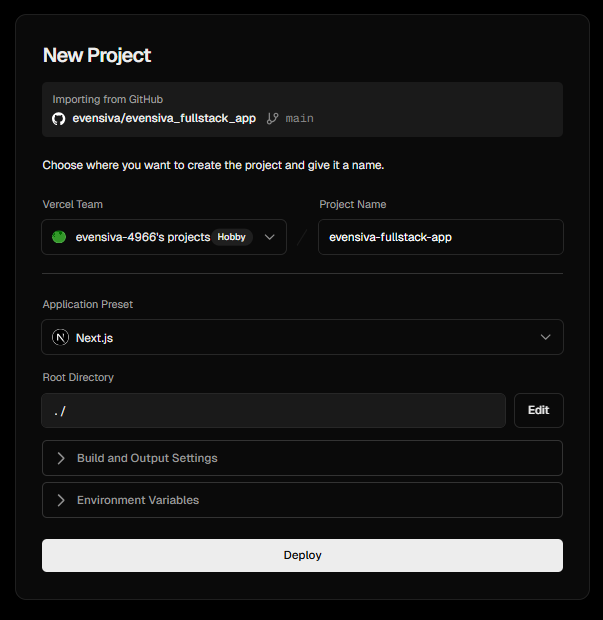
Example New Project flow: importing from GitHub ( evensiva/evensiva_fullstack_app, branchmain), choosing the Vercel team, setting the project name, confirming Next.js and root./, then opening Advanced → Environment Variables or deploying and configuring env vars in project settings. - Import source — The correct GitHub repo and branch (for example
- Add environment variables in Vercel project settings:
DATABASE_URL— your Neon connection stringNEXTAUTH_SECRET— same as local (or generate a new one)GOOGLE_CLIENT_ID,GOOGLE_CLIENT_SECRET— if Google OAuth is enabledGITHUB_ID,GITHUB_SECRET— if GitHub OAuth is enabledNEXT_PUBLIC_GOOGLE_OAUTH_ENABLED,NEXT_PUBLIC_GITHUB_OAUTH_ENABLED— set totrueonly when corresponding provider credentials are configuredADMIN_EMAIL,ADMIN_PASSWORD— for the admin account
NEXTAUTH_URLis not needed on Vercel — it auto-detects the URL. - Deploy. Vercel runs
npm install(which runsprisma generateviapostinstall) →npm run build(next build; Next.js 16 uses Turbopack for production builds by default). - Optional — Custom domain: After the project is live on the default
*.vercel.appURL, open your project in the Vercel dashboard → Settings → Domains (or the Domains tab) → Add. The Add Domain dialog explains that the domain will point at the latest deployment for the chosen environment.- Domain field — Enter your apex or subdomain (for example
evensiva.comorwww.evensiva.com). Vercel will show the DNS records to add at your registrar (A/CNAME or nameservers, depending on setup). - Connect to an environment — Usually select Production so the custom hostname serves your production deployment.
- Redirect to Another Domain — Use this if you want this hostname to send visitors elsewhere (for example apex →
www). Pick a redirect type (for example 307 Temporary Redirect) and the target domain. Skip this if the domain should load the app directly.
Click Save, then create the DNS records Vercel shows (see Domains dashboard and registrar DNS below). Use Refresh after updating DNS; propagation can take a while.
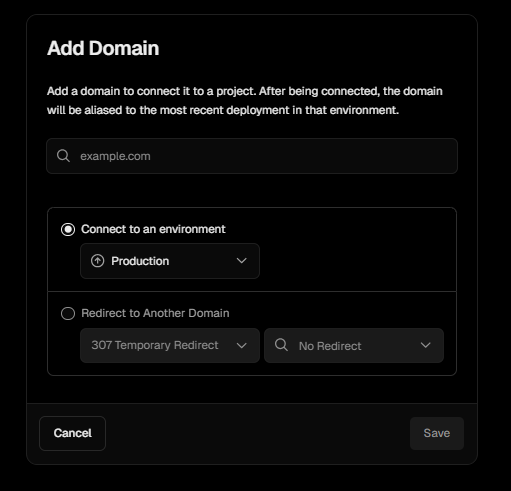
Add Domain: enter the hostname, choose Connect to an environment (for example Production) or Redirect to Another Domain with status code and target, then Save. Finish DNS at your registrar using the records Vercel provides. Domains dashboard and required DNS records
Under Settings → Domains (or the project Domains tab), Vercel lists every hostname: the default
*.vercel.appsubdomain is usually Valid Configuration immediately. Custom domains show Invalid Configuration until the DNS records at your provider match what Vercel expects.- Status — A green check means the domain is verified and traffic can be served; a red warning means records are missing or incorrect.
- Required records — Vercel shows the exact Type, Name (often
@for the apex orwwwfor the subdomain), and Value. Typical patterns: an A record for the apex (for example76.76.21.21— always copy the values from your dashboard, as Vercel may update them) and a CNAME forwwwpointing tocname.vercel-dns.com(with a trailing dot in some UIs). - Redirects — If you configured apex →
www(or the reverse) in Vercel, the list may show an arrow between hostnames; you still need correct DNS for each hostname involved. - Refresh — After you change DNS at the registrar, use Refresh on the domain row so Vercel re-checks. Propagation can take minutes to hours.
- IP / hostname updates — Vercel may show a note that new records were added as part of an IP range expansion; older targets can still work, but prefer the values currently shown in the dashboard.
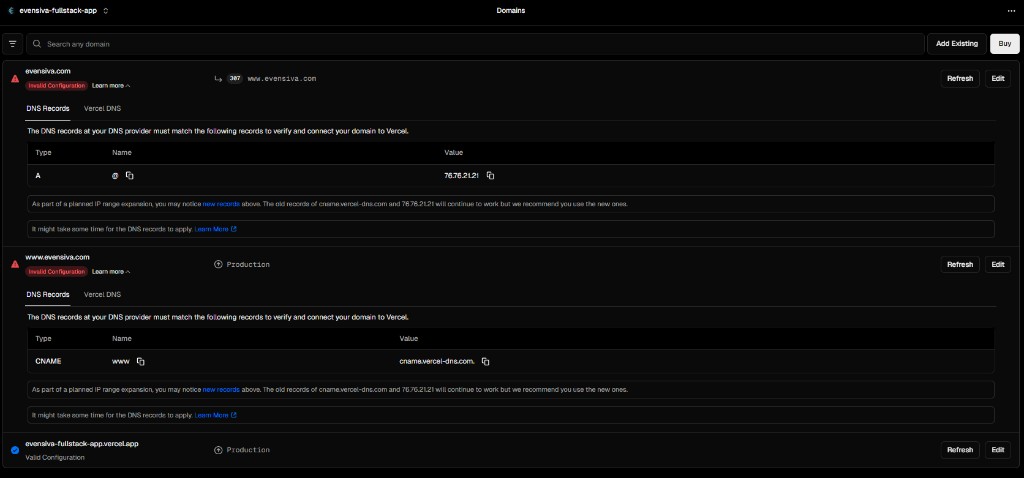
Example Domains view: production *.vercel.appvalid; custom apex andwwwpending until DNS matches. Use the listed A and CNAME rows at your DNS host, then Refresh.DNS at your registrar (example: Namecheap)
Where you edit DNS depends on who answers DNS for your domain:
- Registrar DNS (recommended for simple setups) — If nameservers are set to your registrar’s default (for example Namecheap BasicDNS), open the domain’s Advanced DNS (or equivalent) and add the A and CNAME records exactly as Vercel lists. Save, wait for propagation, then use Refresh in Vercel.
- Third-party nameservers — If nameservers point to another host (for example a legacy web host), you must add or update the same A/CNAME records in that provider’s DNS panel, not only in the registrar, unless you switch nameservers.
- Vercel nameservers — Alternatively, some teams point the domain to Vercel’s nameservers; follow Vercel’s domains documentation for the current nameserver hostnames if you choose that route.
The screenshot below shows Namecheap’s Domain tab with Custom DNS and two nameservers (
ns1.md-91.webhostbox.net,ns2.md-91.webhostbox.net) — meaning DNS is controlled by that host. To use Vercel with record-based setup, either add the Vercel A/CNAME records in that DNS panel, or switch nameservers to the registrar (or Vercel) and then add the records where Vercel instructs.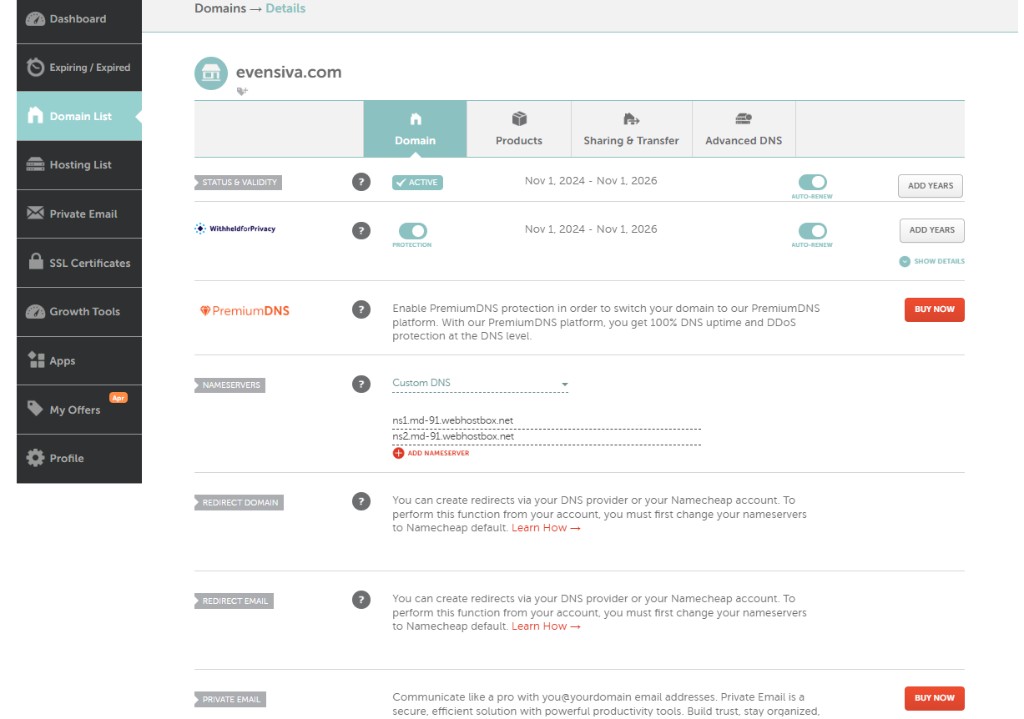
Example: Namecheap Domain settings — Nameservers determine where A/CNAME records must be created. With Custom DNS pointing at another provider, edit DNS there to match Vercel’s required records (or change nameservers per your chosen setup). When all custom domains show Valid Configuration, HTTPS certificates are issued automatically. Set
NEXTAUTH_URLto your canonical public URL if it is not the default*.vercel.app— see Env: NextAuth.js. - Domain field — Enter your apex or subdomain (for example
DATABASE_URL into project env vars or use the Neon integration to link the same Neon project — no need to create a second production database if Neon is already provisioned.Next.js runs middleware.ts on the Edge. This project keeps Prisma and bcrypt out of the middleware bundle by using src/lib/auth.config.ts there (see Authentication Guide → Edge vs Node). That avoids Vercel Hobby’s ~1 MB Edge Function size limit when deploying.
Neon PostgreSQL
Neon is the serverless PostgreSQL provider for Evensiva. The Neon project is set up and in use; the steps below document how it was configured and how to reproduce the flow for a new Neon project or a new teammate onboarding.
Create the Neon project (reference)
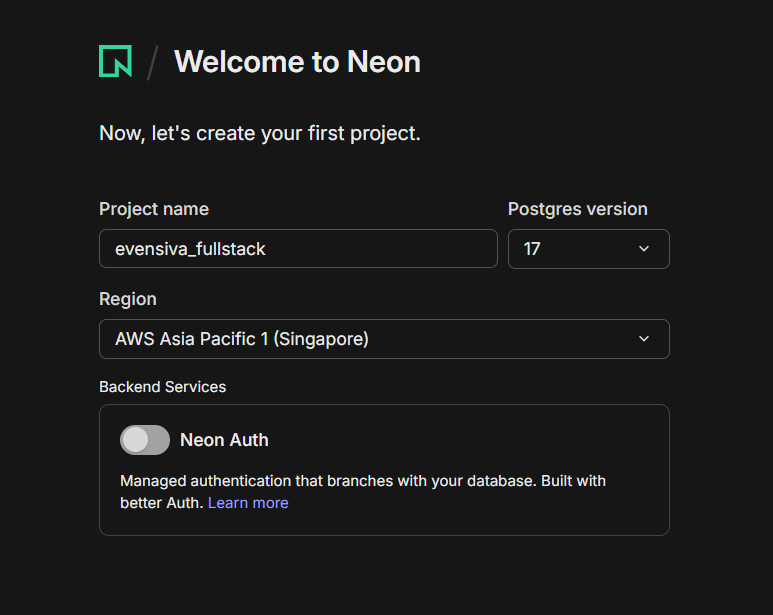
Sign up or log in at neon.tech. On Welcome to Neon (“Now, let’s create your first project”), a typical configuration looks like this:
- Project name — Enter a clear name for this app (for example
evensiva_fullstack). You can use any name; it only identifies the project in your Neon account. - Postgres version — Choose the version offered in the dropdown (for example 17). It works with Prisma and the schema in this repository.
- Region — Pick a region close to your users or your Vercel deployment (for example AWS Asia Pacific 1 (Singapore)).
- Backend Services → Neon Auth — Leave this off for the default Evensiva setup. This project uses NextAuth.js (credentials / JWT) for the admin panel, not Neon’s managed auth. You can enable Neon Auth later only if you intentionally migrate to it.
Project created: connect your app (reference)
After provisioning, Neon shows a success screen (for example Your new project was created in … ms) with two ways to connect:
Option A — Guided CLI (optional)
Under Connect your app with one command, Neon documents this command:
npx neonctl@latest initTypical flow in the terminal (exact prompts can change with neonctl versions):
- Install neonctl — If npm asks to download the package (e.g.
neonctl@2.x), confirm (e.g. typey). - Sign in in the browser — The CLI prints
Awaiting authentication in web browserand opens (or shows a link to) Neon’s OAuth page. Complete sign-in in the browser until you see something likeAuth completein the terminal. - IDE / agent tooling — After auth, the wizard may add the Neon MCP server, editor extensions, and agent skills. You may see a multi-select such as: Cursor (Neon Local Connect), VS Code (Neon Local Connect), Claude CLI (MCP Server), plus other editors (Claude Desktop, Codex, OpenCode, Antigravity, …). Use Space to toggle each option and Enter to confirm — enable only what you use.
Example terminal output (version numbers and prompts may differ; the OAuth link is omitted here):
$ npx neonctl@latest init
Need to install the following packages:
neonctl@2.22.0
Ok to proceed? (y) y

INFO: Awaiting authentication in web browser.
INFO: Auth Url: https://oauth2.neon.tech/oauth2/auth?…
INFO: Auth complete
┌  Adding Neon MCP server, extension (for VS Code and Cursor) and agent skills
│
◆  Which editor(s) would you like to configure? (Space to toggle each option, Enter to
confirm your selection)
│  ◼ Cursor (Neon Local Connect extension)
│  ◼ VS Code (Neon Local Connect extension)
│  ◼ Claude CLI (MCP Server)
│  ◻ Claude Desktop
│  ◻ Codex
│  ◻ OpenCode
│  ◻ Antigravity
│  …
└
This path is optional for the Evensiva app: Prisma only needs DATABASE_URL. You can skip neonctl init entirely and use Option B to paste the connection string into .env.local instead.
Option B — Manual connection string (recommended for Prisma)
Below the divider (Or), use Connect your app manually:
- Open the Connection string tab (not Connection parameters) to get a single PostgreSQL URI.
- Copy the URI with Copy snippet. Use Show password only if you need the password in plain text locally — never share or commit it.
- Set it as
DATABASE_URLin.env.local(and later in Vercel). The value looks like this shape:
# Example shape — replace with the URI from your Neon dashboard
DATABASE_URL="postgresql://USER:PASSWORD@YOUR-HOST.neon.tech/neondb?sslmode=require"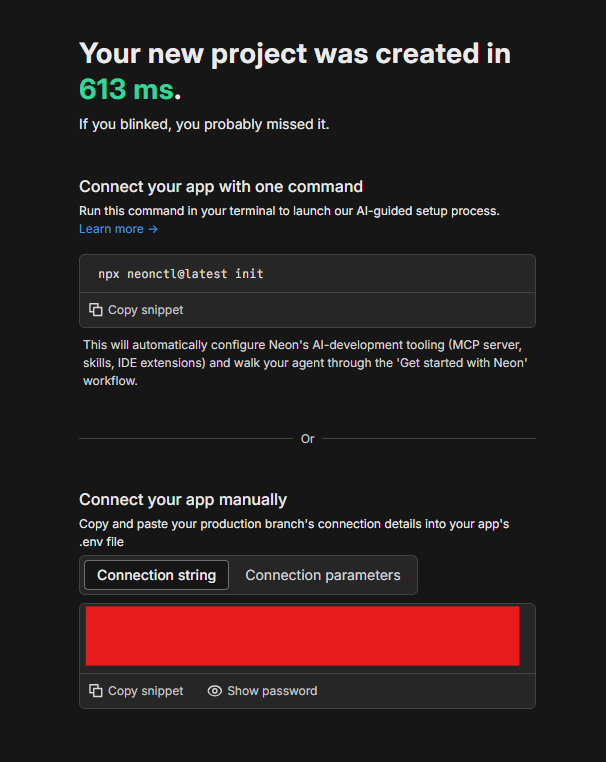
neonctl init, then copy the connection string from the Connection string tab into .env as DATABASE_URL. Redact or mask the URI in your own screenshots before sharing.Connect the app to Neon
With DATABASE_URL set to your Neon connection string:
- Keep the URI only in
.env.localand in your host’s env settings (e.g. Vercel). Never commit secrets to Git. - On each new machine or after schema changes, run
npx prisma db pushto apply the Prisma schema, thennpm run db:seedwhen you need initial seed data (idempotent).
?sslmode=require. Prisma handles this automatically.NPM Scripts
| Script | Command | Description |
|---|---|---|
dev | next dev | Start development server with hot reload |
build | next build | Create production build |
start | next start | Start production server |
lint | next lint | Run ESLint |
postinstall | prisma generate | Auto-generate Prisma Client on install |
db:push | prisma db push | Push schema to DB |
db:migrate | prisma migrate dev | Create and apply migrations |
db:seed | tsx prisma/seed.ts | Seed database with initial data |
db:studio | prisma studio | Open Prisma Studio data browser |
Troubleshooting
Prisma Client not generated
If you see PrismaClientInitializationError, run npx prisma generate manually. This usually means postinstall was skipped.
Database connection refused
Check that DATABASE_URL matches your Neon connection string in .env.local (and Vercel). Confirm the Neon project is active in the console. For local Docker Postgres, ensure the container is running. Neon URIs should include ?sslmode=require.
Build fails with type errors
Run npx next build locally before pushing. Common issues: missing "use client" directives, nullable params from useParams or useSearchParams, or missing type packages (e.g. @types/prismjs).
Build fails: “Functions cannot be passed to Client Components” (Next.js 16)
Server Components cannot pass component functions (for example next/link as component={Link} on MUI Button) into client trees. Move that UI into a file with "use client" at the top, or avoid passing function props across the boundary.
Admin login not working
Ensure the seed script has run (npm run db:seed) and that ADMIN_EMAIL / ADMIN_PASSWORD match what you're typing at /admin/login. Check NEXTAUTH_SECRET is set.
OAuth buttons missing or social login fails
Set both server credentials (GOOGLE_CLIENT_ID/GOOGLE_CLIENT_SECRET, GITHUB_ID/GITHUB_SECRET) and matching public flags (NEXT_PUBLIC_GOOGLE_OAUTH_ENABLED, NEXT_PUBLIC_GITHUB_OAUTH_ENABLED). Verify provider callback URLs point to /api/auth/callback/google and /api/auth/callback/github on the exact domain you are using.
Deploy fails: Edge Function “_middleware” exceeds size limit (Vercel)
If the build succeeds but deployment fails with a message like The Edge Function "_middleware" size is … MB and your plan size limit is 1 MB, the middleware bundle is too large for Vercel Hobby. Common cause: importing the full NextAuth setup from @/lib/auth in middleware.ts, which pulls in Prisma Client and bcrypt.
This repository uses src/lib/auth.config.ts (Edge-safe, no database imports) in middleware.ts and keeps Prisma-backed sign-in in src/lib/auth.ts. See Authentication Guide → Edge vs Node (Vercel). Upgrading to a Vercel plan with a higher Edge limit is an alternative, but slim middleware is the intended fix.